*************************************************************************
Stamps used:
Step one... Stamp first image... Angelica's Heart Socks...
2. Create a mask - by stamping on some masking film (if you don't have any film then you can use a post-it note) ... cut around the image closely and then stick over your initial image.
3. After the first image is masked go ahead and stamp the second image (in this case Angelica's day dream) next to the first image... overlapping the mask.
You could stop there... peel the mask off and colour your image as normal... but I thought I would continue using masks to create a background/ scene.
So I drew in a brick wall for them to be sitting on.. masked it off, then I cut out some cloud shapes from the masking film and stick them on the picture too.. as below..
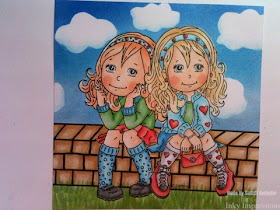
So I went ahead and coloured the scene...
Then decided to crop it a little to fit this card (as below)...
If you use this tutorial, please link it below so we can see what you created and leave some love


Such an amazing tutorial Sammi!! I love that brick wall!! What a creative scene!! Thanks so much!! HUGS
ReplyDeleteWay too awesome.... The way it transforms into a masterpiece is just outstanding!!!! Wishes & Hugs))))
ReplyDeleteAsh...
(http://hastkala-oceanichope.blogspot.com/)
FANTASTIC tutorial Sammi, wonderful summer scene you have created! Thank you for sharing, take careX:)
ReplyDeleteI have always wanted to know how to do that! Thanks - I have masked one image but not layered over like this so simple when it is explained!
ReplyDeletethis is an awesome tutorial! I finally get masking thanks to you!
ReplyDeleteIts nice............
ReplyDelete